Auto-provisioning Yealink IP phones with RingQ ensures a smooth and efficient deployment process, allowing devices to be configured automatically without manual setup. This saves time, reduces errors, and simplifies large-scale installations. By linking your Yealink phones directly to the RingQ provisioning server, all settings—such as SIP accounts, extensions, and network configurations—are applied automatically once the phones are connected to the network. In this guide, we’ll walk you through the complete process of auto-provisioning Yealink IP phones with RingQ, including prerequisites, configuration steps, and troubleshooting tips to help you get your devices up and running quickly and reliably.
On your computer, open a web browser.
1. In the address bar, type your phone’s IP address. Example: http://192.168.100.xxx.
2. Enter your login credentials: Username: admin Password: admin (default if unchanged)
1. Once logged in, locate and copy the MAC Address from the web interface.
2. Alternatively, check the sticker on the back or bottom of the phone.
3. The MAC Address is typically a 12-digit alphanumeric string (e.g., 001565A1B2C3).
1. Login to your RingQ web app and go to “Accounts”.
2. Select the extension you want to provision the IP phone for.
3. Open Overview.
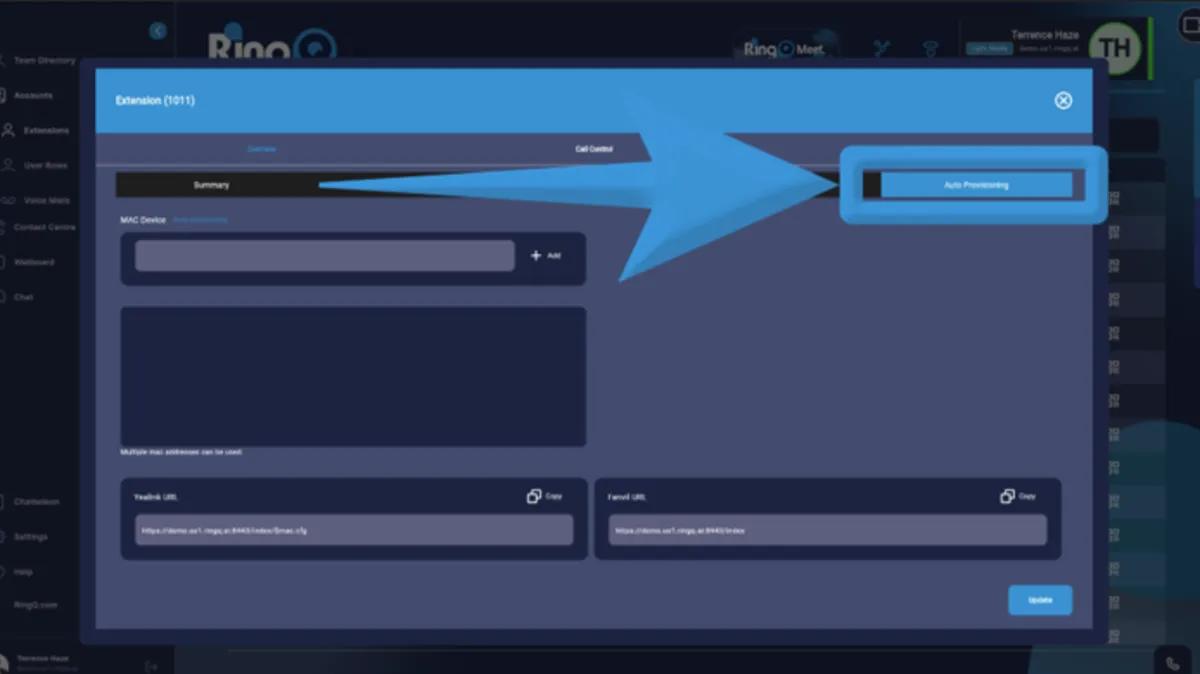
Auto-provision your Yealink IP Phone with RingQ.
4. Choose Auto-Provision for that extension.
1. Open the Auto-Provision Page in the RingQ web application.
2. In the MAC Address field, paste or type the copied MAC address.
3. Click Add to register the device.
4. Select the appropriate:
5. Click Update to save the configuration.
6. A Yealink Auto-Provisioning URL will be generated automatically.
1. Locate the Yealink device entry you just created.
2. Click the Copy button next to the Server URL to copy it.
3. Keep this URL handy — it will be used in your Yealink phone’s configuration.
1. Go back to your Yealink Web Interface.
2. Navigate to Settings → Auto Provision.
3. In the Server URL field, paste the copied RingQ Provisioning URL.
4. Click Confirm or Update to save the setting.
5. Click Auto Provision Now or wait for the phone to auto-reboot.
1. Return to your RingQ Web App → Device Management.
2. Check that the Yealink device status shows Online or Registered.
3. Perform a test call to verify inbound and outbound audio.
4. If registration fails:
| Step | Action | Location |
|---|---|---|
| 1 | Get IP & login credentials | Yealink phone |
| 2 | Retrieve MAC address | Yealink Web UI / Device label |
| 3 | Assign to extension | RingQ Web App |
| 4 | Add MAC & select Time Zone, STUN | RingQ Auto-Provision Page |
| 5 | Copy provisioning URL | RingQ Auto-Provision Page |
| 6 | Paste URL in Server URL field | Yealink Web UI |
| 7 | Click Update / Auto Provision | Yealink Web UI |
| 8 | Verify registration | RingQ Web App |
| 9 | Row 8, Col 2 | Row 8, Col 3 |
Your Yealink IP Phone is now successfully configured and registered with RingQ.
