
Set Up a Custom FQDN (Your Own Domain)
A custom FQDN lets your RingQ server run on your own domain, for example pbx.yourcompany.com, instead of a RingQ address such as yourcompany.ringq.ai. You set it up yourself in the RingQ Customer Access Portal (CAP) at cap.ringq.com: choose your domain, add two DNS records, download a free security certificate, and upload it when you activate the server.
This guide covers both editions: Part A for a single-tenant server and Part B for a multi-tenant server. To learn how RingQ addresses work, see Understanding RingQ FQDNs.
| Single-tenant (ST) | Multi-tenant (MT) | |
|---|---|---|
| What you enter in CAP | pbx.yourcompany.com or yourcompany.com | Base domain voice.yourcompany.com |
| RingQ opens at | https://pbx.yourcompany.com/cloudapp/ | https://multi.voice.yourcompany.com/ |
| Tenants open at | Not applicable | https://<tenant>.voice.yourcompany.com/ |
| DNS A record | pbx (or @ for the domain itself) | Wildcard *.voice |
| DNS TXT record (for the certificate) | _acme-challenge.pbx | _acme-challenge.voice |
| Certificate | Free, for pbx.yourcompany.com | Free wildcard, for *.voice.yourcompany.com |
| Valid for | 90 days, renew from CAP | 90 days, renew from CAP |
Before You Begin
Make sure you have everything below. The whole setup takes about 20 to 30 minutes, most of it waiting for DNS.
| You need | Details |
|---|---|
| A RingQ license in CAP | An unused Self Managed license in your CAP account. Licenses hosted by RingQ always use a RingQ address. |
| A domain you control | Access to your DNS provider (Cloudflare, GoDaddy, Namecheap or any other). You add one A record and one TXT record. |
| A fresh Linux server | With a public IP address, ready for the RingQ installer. |
| Open ports | TCP 80, 443, 8443 and 7443, plus SIP and media ports: 5060 and UDP 16384 to 32768. |
| A current browser | Chrome, Edge, Firefox or Safari. The certificate key is created in your browser. |
| Access to the license email | Activation sends a 6-digit code to the contact on the license. |
⚠ IMPORTANT
Choose your domain carefully. It becomes the permanent web address of your RingQ server and of every app and desk phone that connects to it. Changing it later means re-activating the server.
Domain Rules
| Edition | Allowed | Not allowed |
|---|---|---|
| Single-tenant | Your domain itself (yourcompany.com) or one name in front of it (pbx.yourcompany.com, pbx.yourcompany.com.sg) | Two or more names in front, IP addresses, ringq.ai or ringq.cloud names |
| Multi-tenant | Exactly one name in front of your domain (voice.yourcompany.com, voice.yourcompany.com.sg) | The domain alone, a * wildcard, a name starting with multi, ringq.ai or ringq.cloud names |
Use lowercase letters, numbers and hyphens only.
Part A: Single-Tenant Server
In this example the custom FQDN is pbx.yourcompany.com. Replace it with your own domain in every step.
Step 1 — Start the License Setup in CAP
- Sign in at cap.ringq.com and open Licenses.
- Find your unused license and click its setup icon (the tooltip says Single Tenant).
- Fill in the contact and company details and click Next until you reach Product.
Step 2 — Choose "Use my own domain"
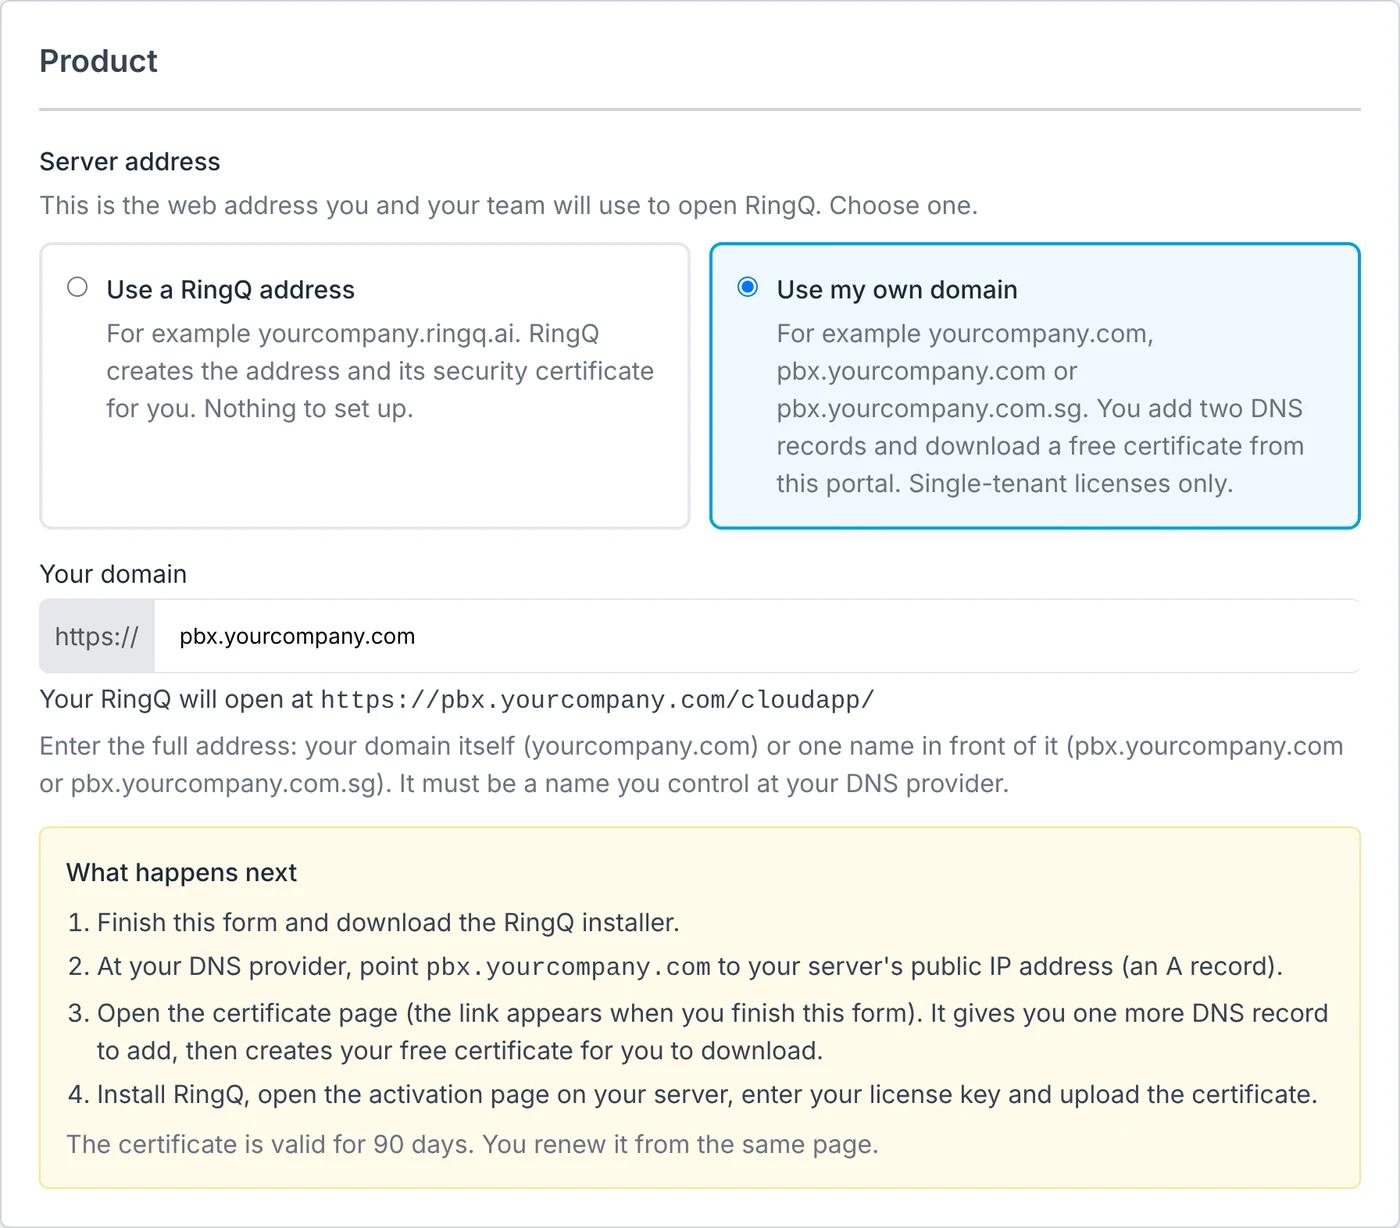
- Under Server address, select Use my own domain.
- In Your domain, type the full address, for example pbx.yourcompany.com. CAP shows where RingQ will open: https://pbx.yourcompany.com/cloudapp/.
- Read the What happens next box, then finish the form and click Submit.
💡 TIP
If CAP shows an error under the address, check the domain rules above. The most common mistake is two names in front of the domain, for example pbx.office.yourcompany.com.
Step 3 — Open the Custom Domain Setup Page
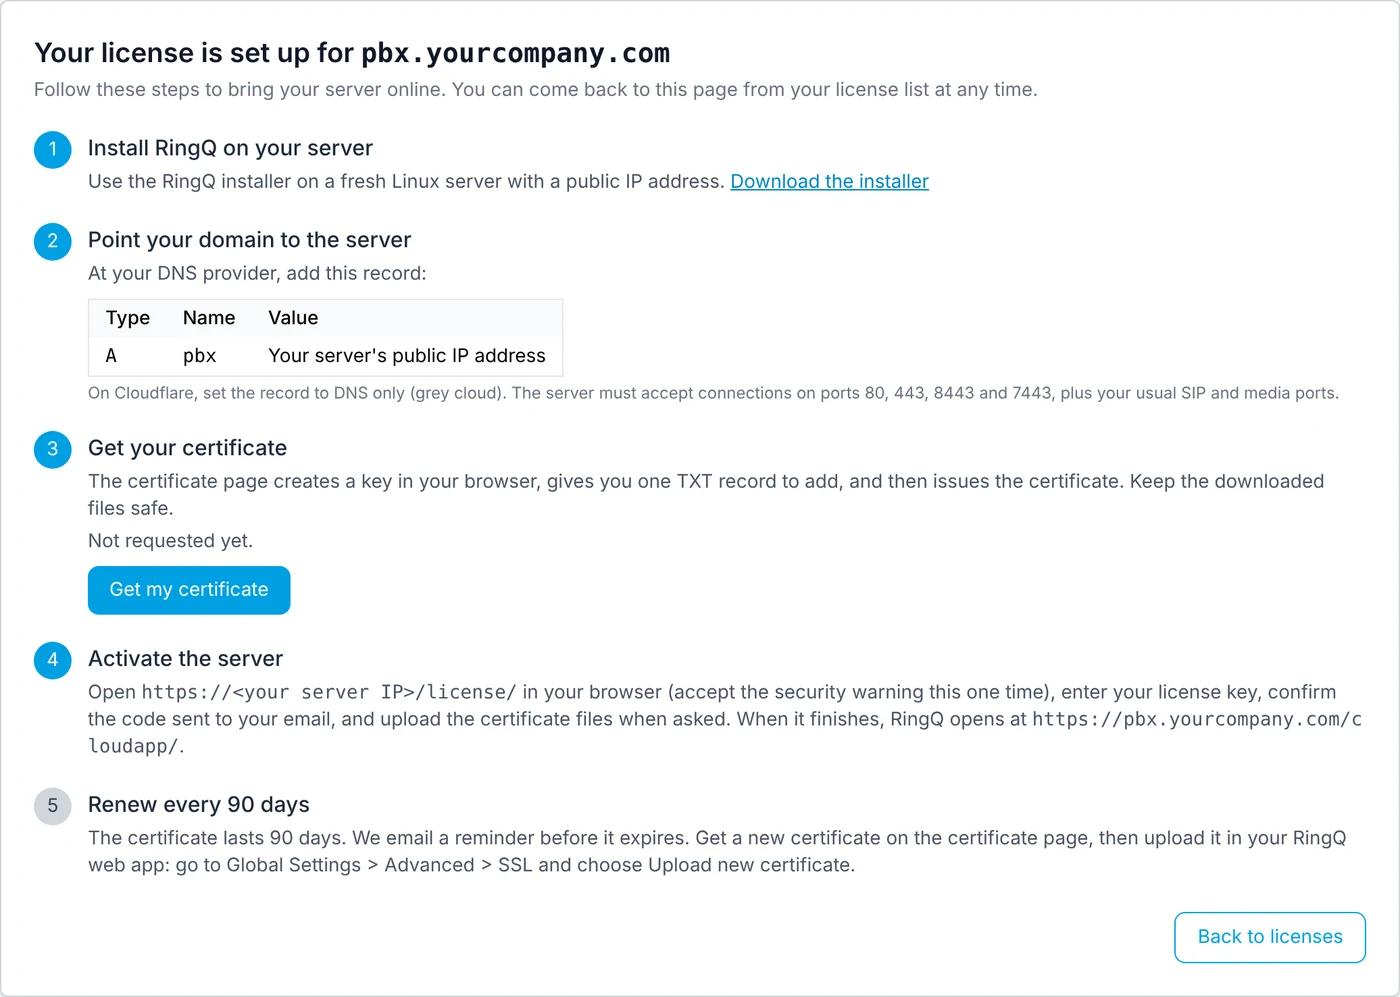
When the form is saved, CAP opens Your license is set up for pbx.yourcompany.com, which lists every remaining step with your real values. To come back to it later, open Licenses and click the padlock icon on the license row (Custom domain setup and certificate).
Step 4 — Install RingQ on Your Server
Click Download the installer and run the RingQ installer on your fresh Linux server. Note the server's public IP address.
Step 5 — Add the A Record
| Type | Name | Value | Notes |
|---|---|---|---|
| A | pbx | Server public IP | For pbx.yourcompany.com |
| A | @ | Server public IP | Only if you use the domain itself, yourcompany.com |
⚠ IMPORTANT
On Cloudflare, set the record to DNS only (grey cloud). A proxied (orange cloud) record blocks calls and the certificate check.
Step 6 — Get Your Free Certificate
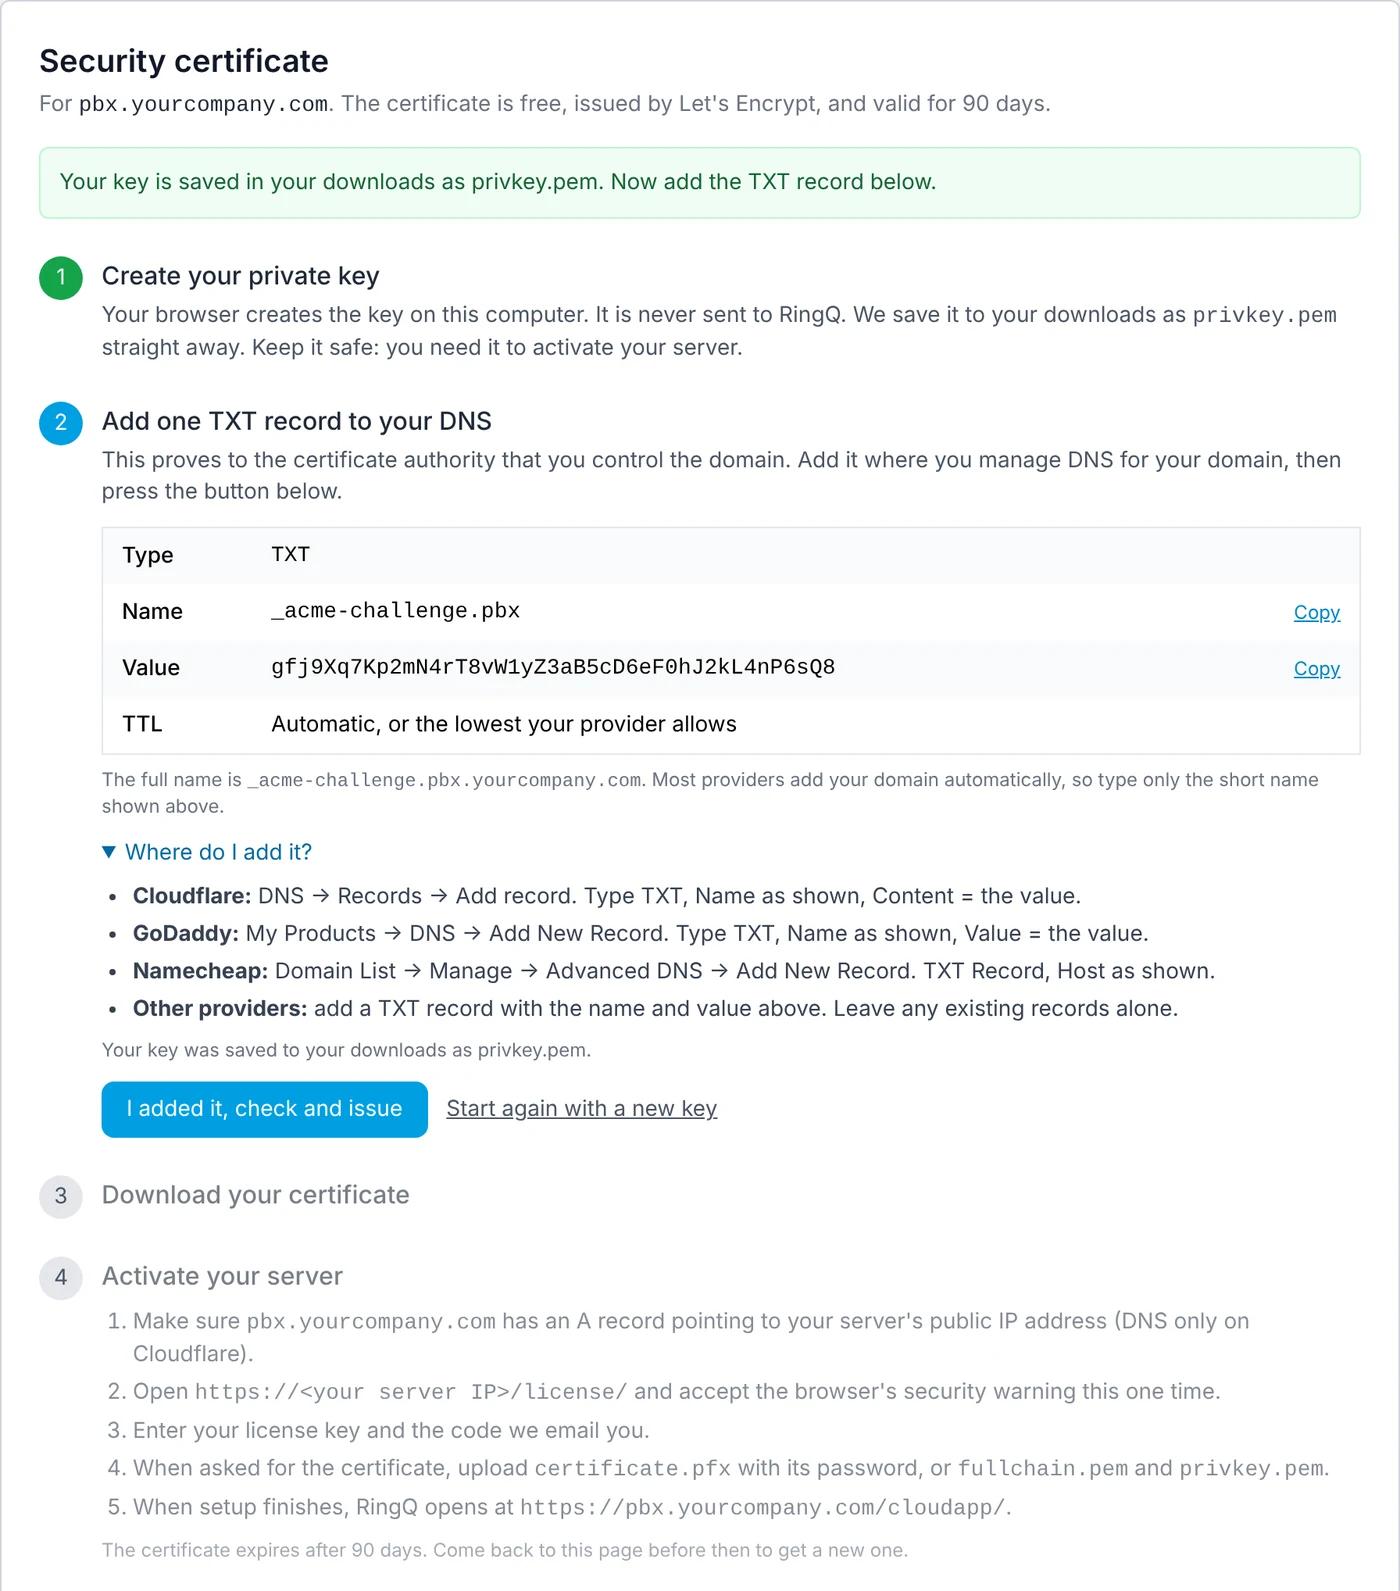
On the setup page, click Get my certificate. The Security certificate page opens. The certificate is free, issued by Let's Encrypt, and valid for 90 days.
- Click Create key and request certificate. Your browser creates the private key on your computer and saves it to your downloads as privkey.pem. The key is never sent to RingQ. Keep this file safe.
- Add the TXT record shown on the page at your DNS provider. Use the Copy links. Most providers add your domain automatically, so type only the short name, _acme-challenge.pbx.
- Wait a minute or two, then click I added it, check and issue. The page keeps checking while the certificate authority confirms the record.
| Type | Name | Value | TTL |
|---|---|---|---|
| TXT | _acme-challenge.pbx | The value shown on the page (unique to each request) | Automatic, or the lowest your provider allows |
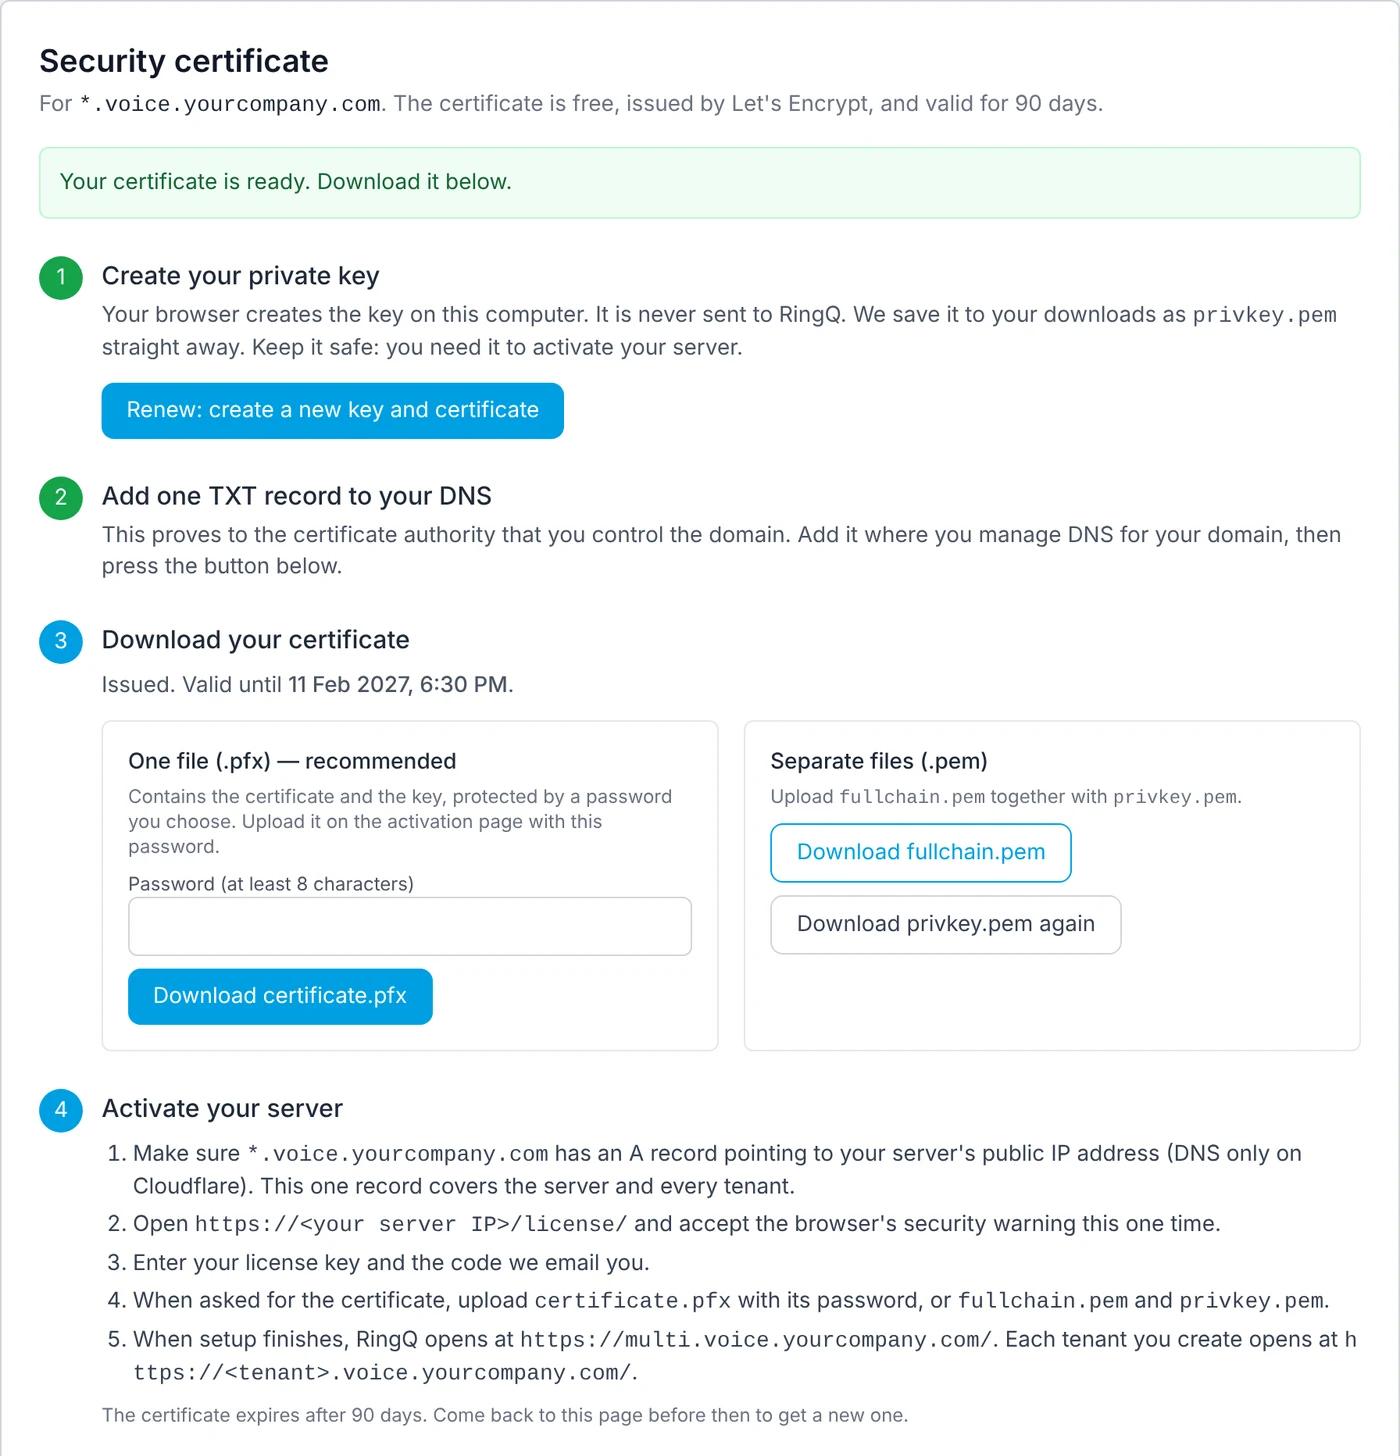
When the certificate is issued, choose a format under Download your certificate:
| Format | How to download | What you upload later |
|---|---|---|
| One file (.pfx), recommended | Type a password of at least 8 characters, then click Download certificate.pfx. | certificate.pfx and its password |
| Separate files (.pem) | Click Download fullchain.pem. You already have privkey.pem from the first step. | fullchain.pem and privkey.pem |
📝 NOTE
If the page asks for privkey.pem (for example on a different computer), choose the file saved when you started the request. It is read on your computer only. If you no longer have it, click Renew: create a new key and certificate and add the new TXT record.
Step 7 — Activate the Server
- Open https://<your server IP>/license/ in your browser and accept the security warning this one time.
- Enter your License key and click Continue.
- Enter the 6-digit Verification code sent to the license contact and click Verify.
- If the server has more than one network connection, choose the one that faces your phones.
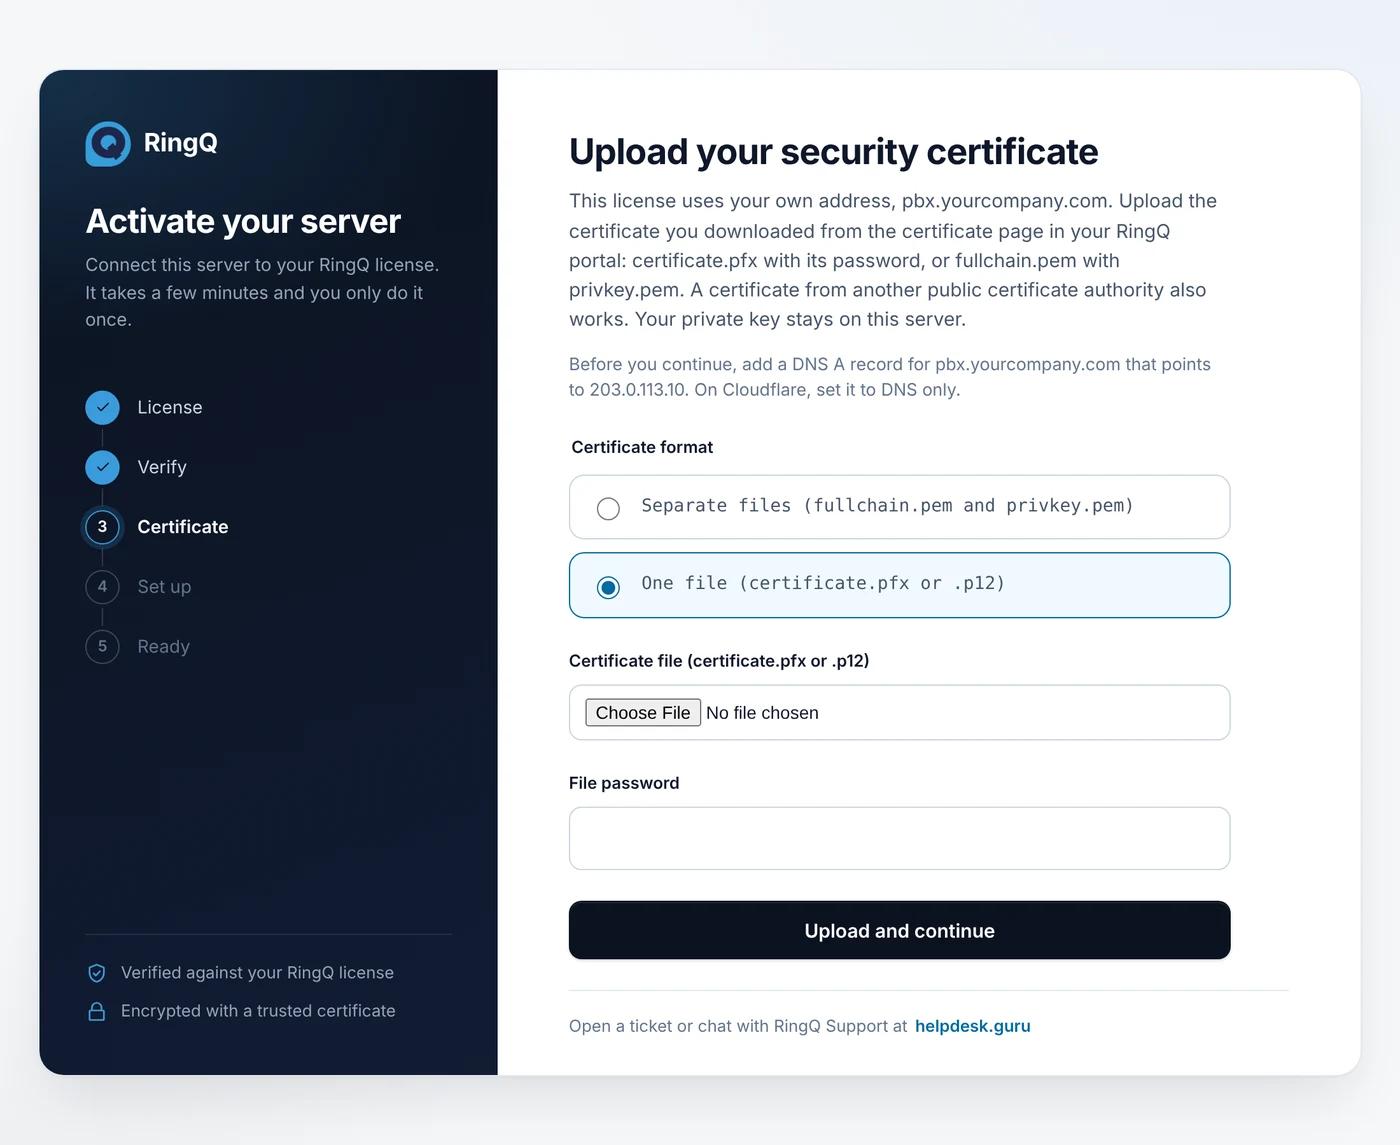
- On Upload your security certificate, upload certificate.pfx with its password, or fullchain.pem and privkey.pem, and click Upload and continue.
- When setup finishes, copy the sign-in details shown on Your RingQ server is ready. They are shown only once.
💡 TIP
A certificate from another public certificate authority also works if it is issued for your exact domain and has at least 30 days left. Self-signed and private certificate authorities are not accepted.
Step 8 — Open RingQ on Your Domain
Open https://pbx.yourcompany.com/cloudapp/ and sign in. The browser shows a padlock with no warning. Your apps and desk phones now use this address.
Part B: Multi-Tenant Server
A multi-tenant server uses a base domain, in this example voice.yourcompany.com. The server opens at multi.voice.yourcompany.com and each tenant at a name under it, for example acme.voice.yourcompany.com. One wildcard DNS record and one wildcard certificate cover the server and every tenant.
| Address | Example | Used by |
|---|---|---|
| Base domain | voice.yourcompany.com | What you enter in CAP |
| System (main tenant) | https://multi.voice.yourcompany.com/ | Server owner and administrators |
| Each tenant | https://acme.voice.yourcompany.com/ | Each customer group on the server |
| Certificate | *.voice.yourcompany.com | Covers all of the above |
Step 1 — Start the License Setup in CAP
- Sign in at cap.ringq.com and open Licenses.
- Find your unused multi-tenant license and click its setup icon (the tooltip says Multi tenant).
- Fill in the contact and company details and click Next until you reach Product.
Step 2 — Choose "Use my own domain" and Enter the Base Domain
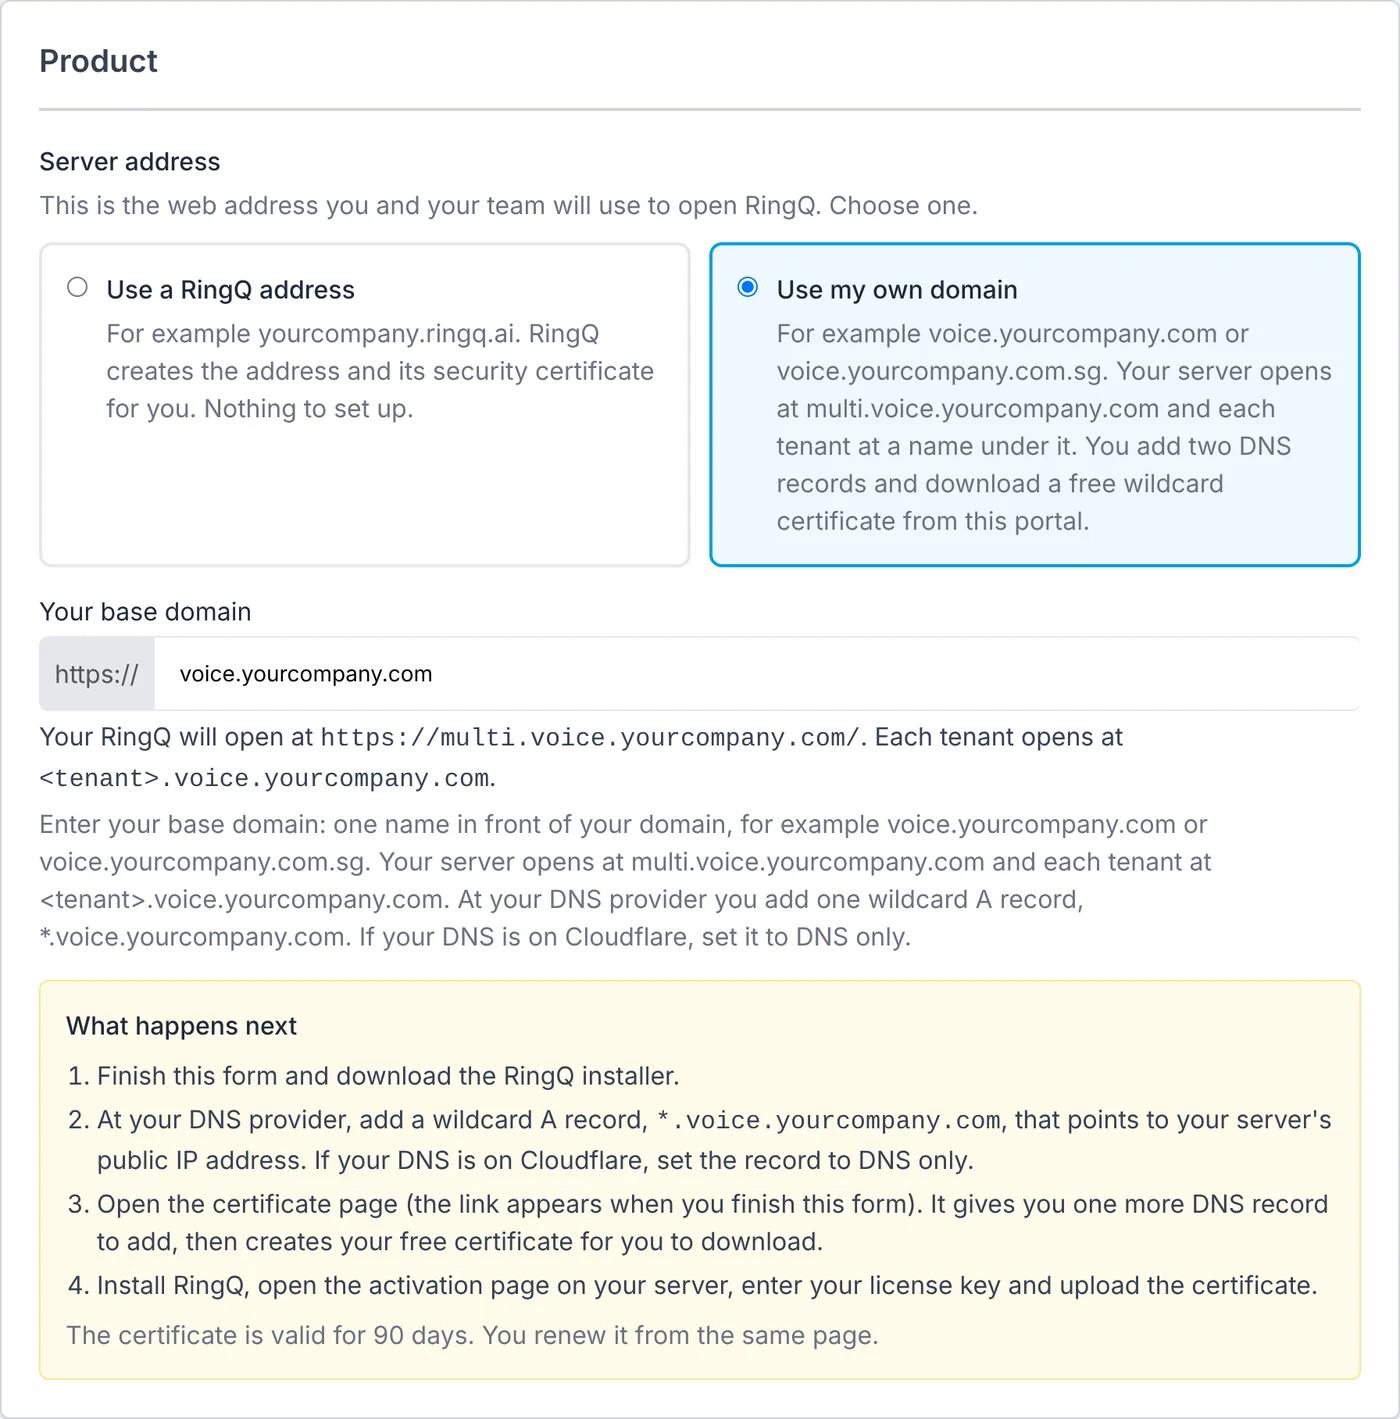
- Under Server address, select Use my own domain.
- In Your base domain, type exactly one name in front of your domain, for example voice.yourcompany.com. Do not type multi or *: RingQ adds them for you.
- Check the preview, Your RingQ will open at https://multi.voice.yourcompany.com/, then finish the form and click Submit.
Step 3 — Open the Custom Domain Setup Page
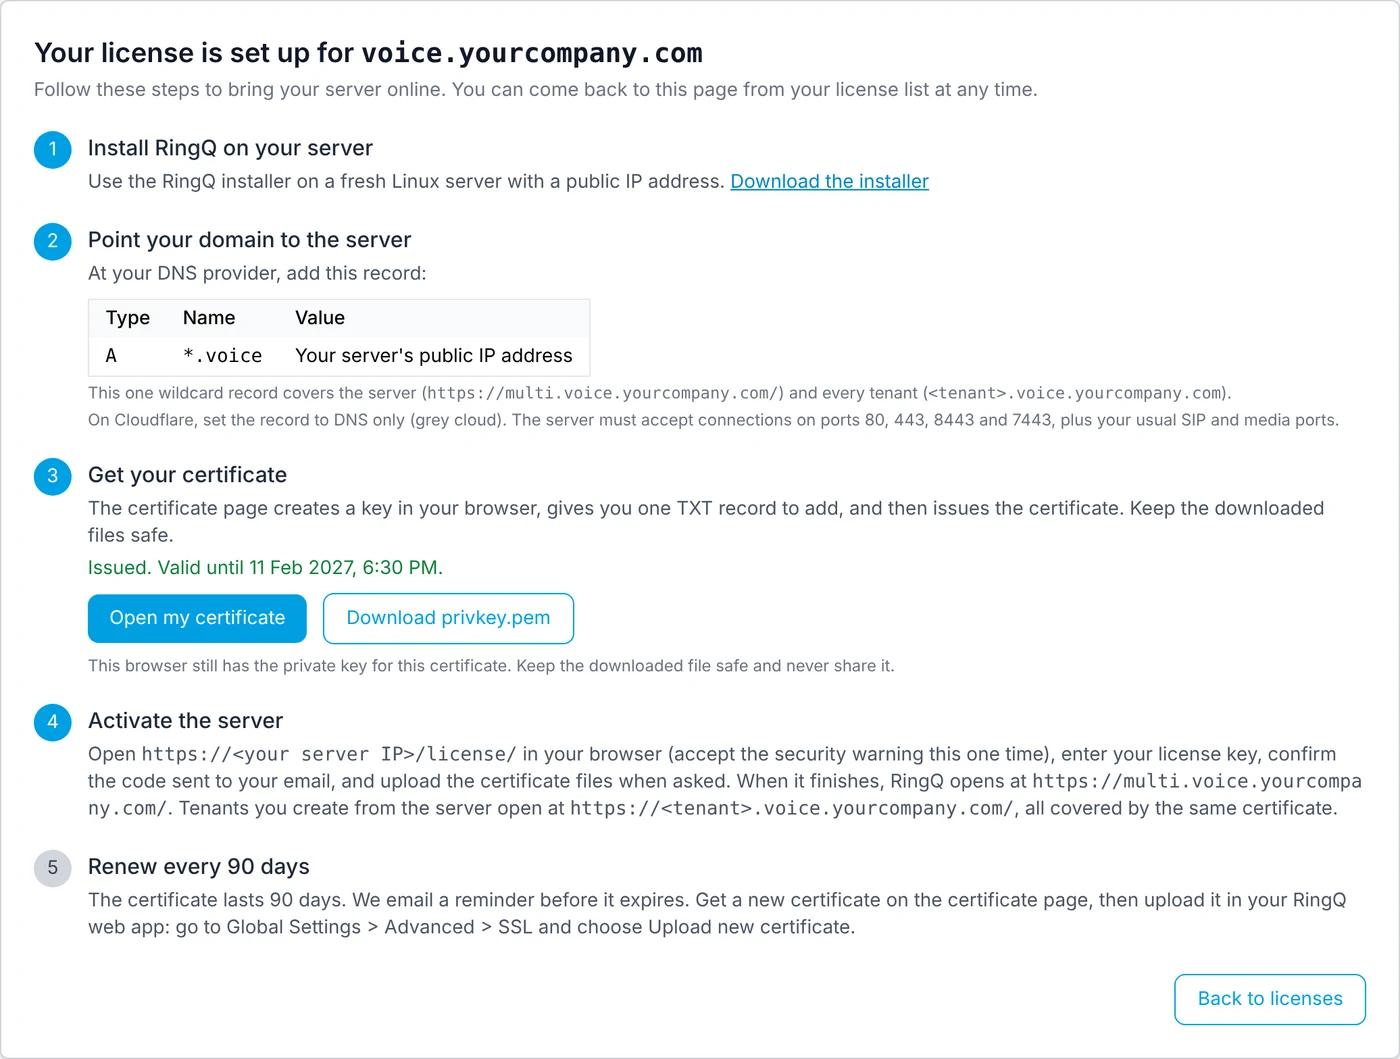
CAP opens Your license is set up for voice.yourcompany.com with your real values. You can reopen it from Licenses with the padlock icon on the license row.
Step 4 — Install RingQ on Your Server
Click Download the installer and run it on a fresh Linux server with a public IP address.
Step 5 — Add the Wildcard A Record
| Type | Name | Value | Covers |
|---|---|---|---|
| A | *.voice | Server public IP | multi.voice.yourcompany.com and every <tenant>.voice.yourcompany.com |
⚠ IMPORTANT
Add the record as a wildcard (*.voice), not just multi.voice, or new tenants will not open. On Cloudflare, set it to DNS only (grey cloud).
Step 6 — Get Your Free Wildcard Certificate
Click Get my certificate and follow Part A, Step 6. Only the names are different:
| Item | Multi-tenant value |
|---|---|
| Certificate is for | *.voice.yourcompany.com (wildcard) |
| TXT record name | _acme-challenge.voice (full name _acme-challenge.voice.yourcompany.com) |
| TXT record value | The value shown on the page |
| Files you download | certificate.pfx with its password, or fullchain.pem and privkey.pem |
Step 7 — Activate the Server
- Open https://<your server IP>/license/ and accept the security warning this one time.
- Enter your License key, then the 6-digit Verification code.
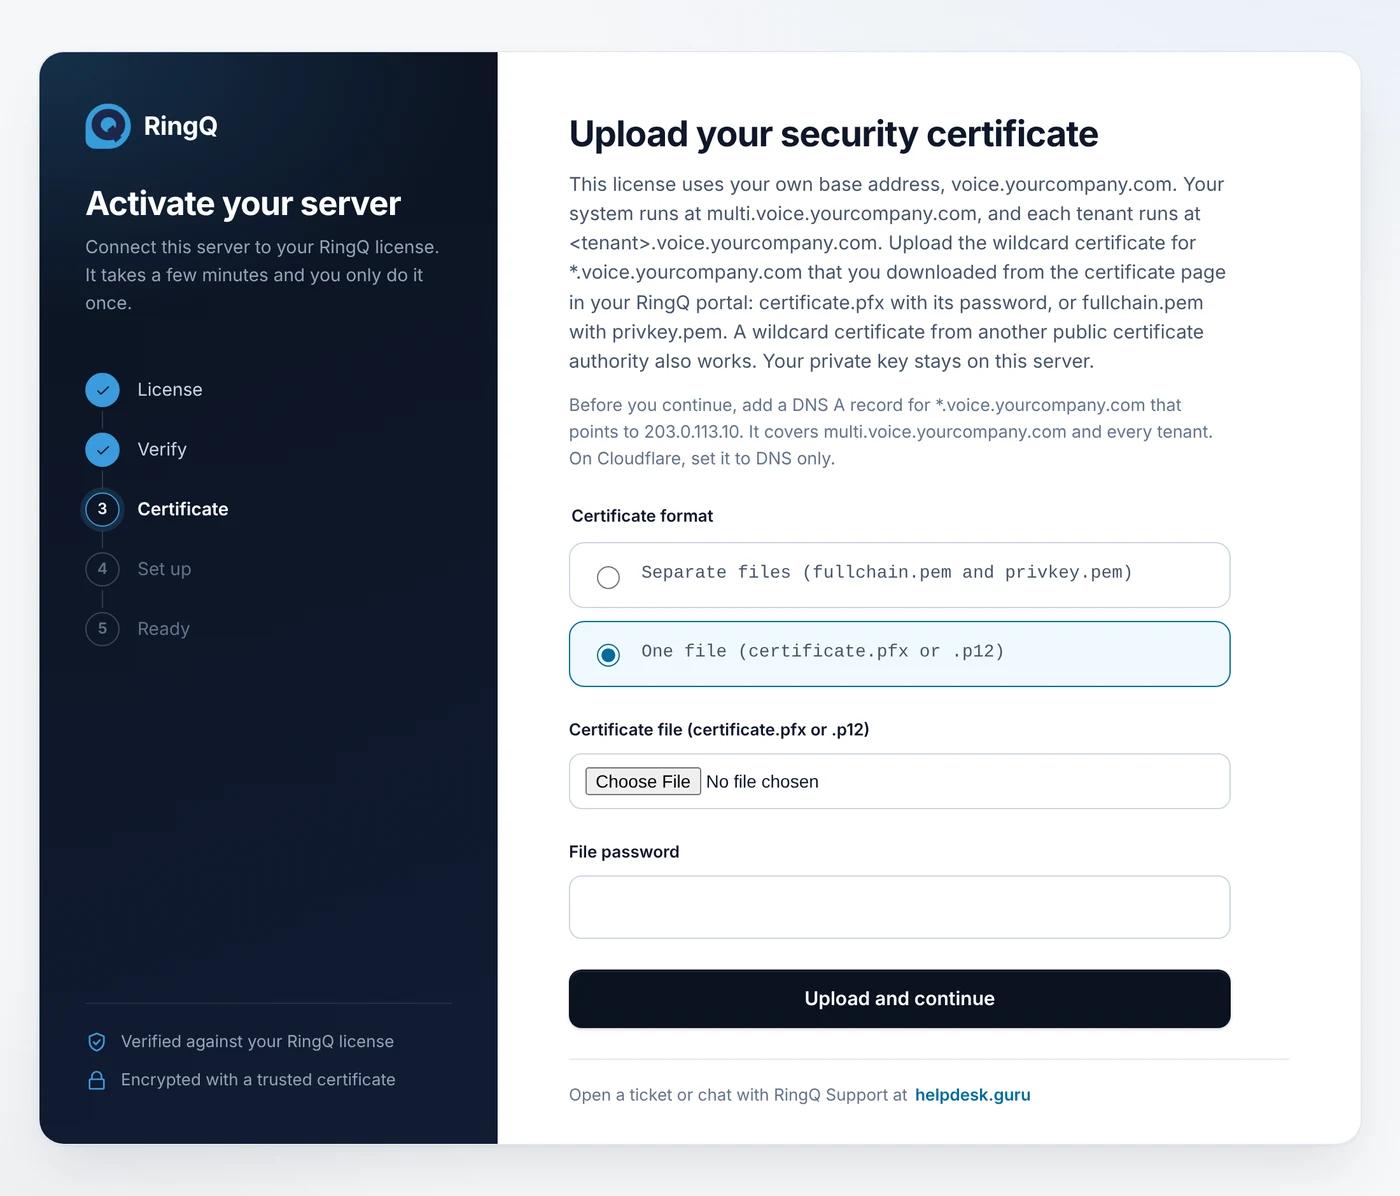
- On Upload your security certificate, upload the wildcard certificate for *.voice.yourcompany.com and click Upload and continue.
- When setup finishes, copy the sign-in details. They are shown only once.
Step 8 — Open the System Address and Add Your First Tenant
- Open https://multi.voice.yourcompany.com/ and sign in. The browser shows a padlock with no warning.
- In CAP, open Licenses and choose Add Tenant. The tenant opens at https://<tenant>.voice.yourcompany.com/ with no extra DNS record or certificate.
Renew the Certificate Every 90 Days
A certificate for your own domain lasts 90 days. RingQ cannot renew it on its own because the DNS is yours, so RingQ emails the license contact 30, 14 and 3 days before it expires. Renewal takes about five minutes:
- In CAP, open Licenses, click the padlock icon on the license, then Open my certificate.
- Click Renew: create a new key and certificate. A new privkey.pem is saved to your downloads. Your current certificate keeps working until it expires.
- Replace the TXT record value with the new one, click I added it, check and issue, and download the new certificate.
- Sign in to the RingQ web app as the Owner (multi-tenant: on the multi. system address) and go to Global Settings > Advanced > SSL > Upload new certificate.
- Click Send code, enter the code emailed to you (it expires in 5 minutes), choose the files and click Upload certificate.
📝 NOTE
RingQ Call Services switch to the new certificate when no calls are in progress, so live calls are not dropped. The new certificate must expire later than the one already installed.
Good to Know
| Topic | What to expect |
|---|---|
| Certificate requests | Up to 5 new requests per license in 24 hours. |
| Private key | Created in your browser and never sent to RingQ. Keep the downloaded privkey.pem safe. |
| Other certificate authorities | Accepted if publicly trusted, issued for the exact name (or the wildcard for multi-tenant), with at least 30 days left. |
| Who can do it | The CAP account that owns the license. A partner sub-account needs the setup permission. |
| Hosted licenses | Licenses hosted by RingQ always use a RingQ address and certificate. |
Troubleshooting
| Message you see | What to do |
|---|---|
| We cannot see the record yet. | New DNS records can take a few minutes to appear. Wait, then click I added it, check and issue again. |
| We found a TXT record, but its value is different. | Copy the whole value again and delete any older TXT record with the same name. |
| You have started 5 certificate requests in the last 24 hours. | Wait until the next day, then try again. |
| This request expired. | Click Start again with a new key and add the new TXT record. |
| This certificate is for a different address. | Upload the certificate issued for the name shown. Multi-tenant needs the wildcard certificate. |
| This key doesn't match the certificate. | Choose the privkey.pem saved when you started that request, or use the .pfx file. |
| We couldn't verify this certificate. | Add the chain file from your certificate authority, or use fullchain.pem from CAP. |
| This certificate expires too soon. | It needs at least 30 days left. Renew it in CAP and upload the new one. |
| The browser shows a security warning on your domain. | Check that the A record points to the right IP and is DNS only on Cloudflare, and that ports 80 and 443 are open. |
Still stuck? Open a ticket or chat with RingQ Support at helpdesk.guru and include your domain and license key.
Quick Reference Summary
| # | Step | Single-tenant | Multi-tenant |
|---|---|---|---|
| 1 | Start setup in CAP | Licenses > setup icon (Single Tenant) | Licenses > setup icon (Multi tenant) |
| 2 | Use my own domain | pbx.yourcompany.com | voice.yourcompany.com |
| 3 | Setup page | Padlock icon on the license | Padlock icon on the license |
| 4 | Install RingQ | Fresh Linux server, public IP | Fresh Linux server, public IP |
| 5 | A record | pbx to server IP | *.voice to server IP |
| 6 | Certificate | TXT _acme-challenge.pbx | TXT _acme-challenge.voice |
| 7 | Activate | https://<IP>/license/, upload certificate | https://<IP>/license/, upload wildcard certificate |
| 8 | Open RingQ | https://pbx.yourcompany.com/cloudapp/ | https://multi.voice.yourcompany.com/ |
| Renew | Every 90 days: CAP, then Global Settings > Advanced > SSL | Same, on the multi. system address |