GUIDE TO
RingQ Portal — Monitoring, Cleanup, and Disk Alert Configuration
The Storage Management panel in RingQ allows administrators to monitor disk usage, manually clean up specific data categories, configure disk space alert emails, and set up automatic scheduled cleanup rules. This guide covers how to access Storage Management and use each of its features.
From the RingQ portal, go to General Setting. Scroll down to the Advanced section and click the Storage tile (stack icon, highlighted below).
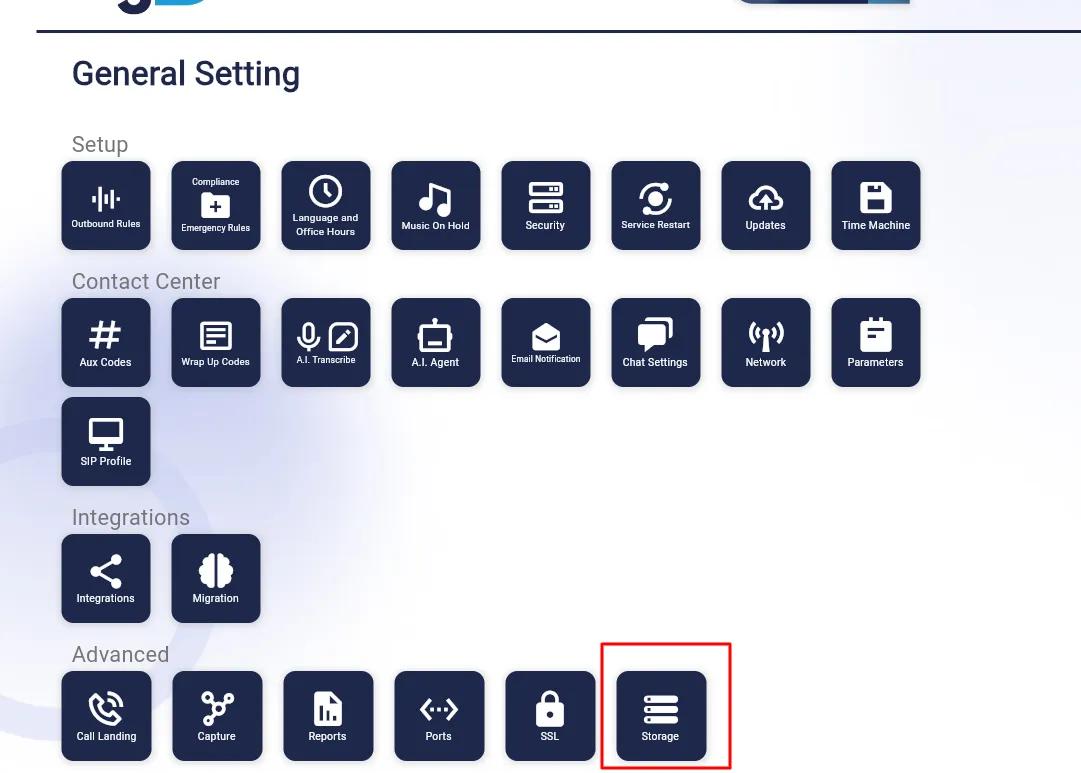
Fig. 1 — General Setting page. Click the Storage tile under the Advanced section (highlighted in red).
The Storage Management panel opens showing an overview of current disk usage and a list of data categories that can be cleaned up individually.
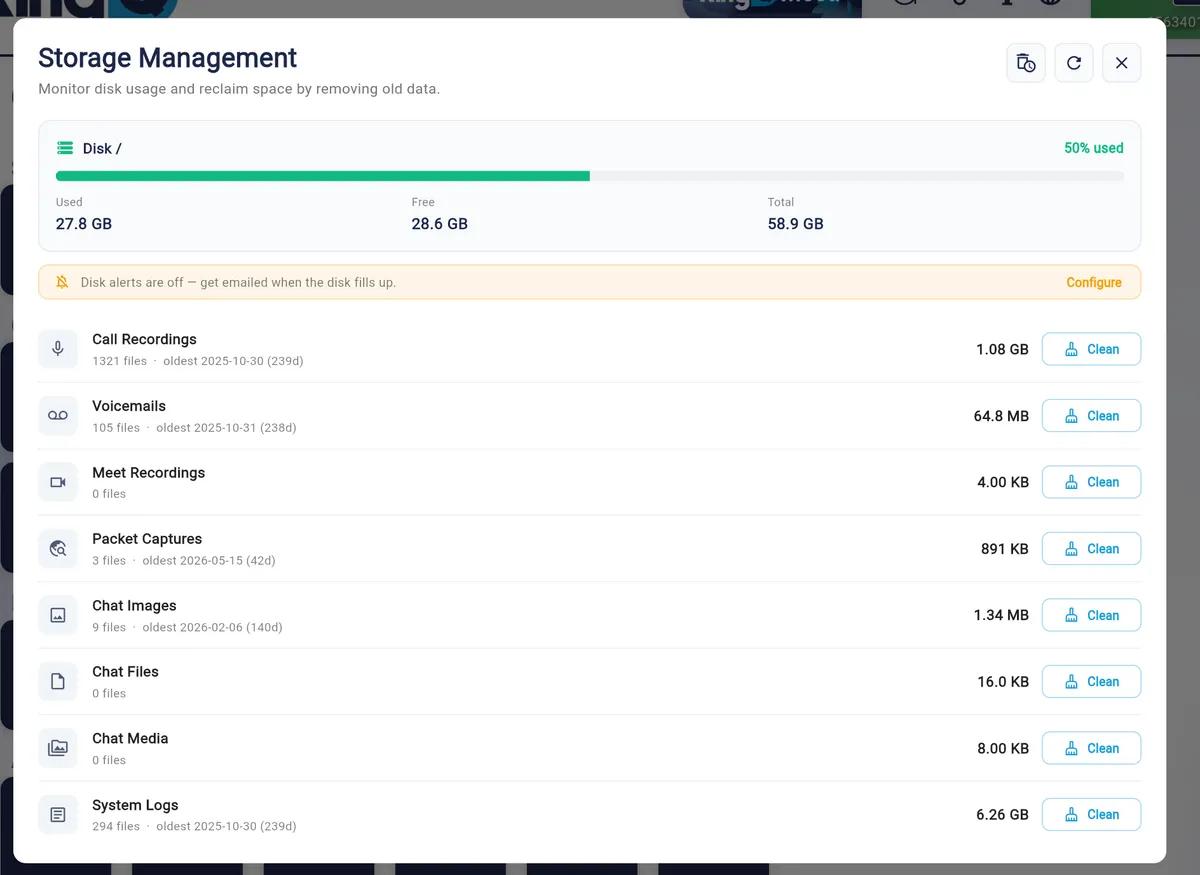
Fig. 2 — Storage Management panel showing disk usage (50% used, 27.8 GB of 58.9 GB) and a breakdown by data category.
The panel contains the following sections:
Disk Usage Bar — Shows total disk capacity, space used, and space free with a visual progress bar. The percentage used is displayed in green while capacity is healthy.
Disk Alerts Banner — Shown when disk space email alerts are not configured. Click Configure to set up alert thresholds and recipient emails.
Data Category List — Each category shows the number of files, the age of the oldest file, and its total size. Click Clean on any row to manually delete all files in that category.
The following data categories are shown in the panel:
| Category | Scope | Description |
|---|---|---|
| Call Recordings | This Tenant | Recorded calls for this tenant instance. |
| Voicemails | This Tenant | Voicemail audio files left for extensions. |
| Meet Recordings | Server-Wide | Video/audio recordings from RingQ Meet sessions. |
| Packet Captures | Server-Wide | Network packet capture files used for diagnostics. |
| Chat Images | Server-Wide | Images shared in chat conversations. |
| Chat Files | Server-Wide | Files shared in chat conversations. |
| Chat Media | Server-Wide | Other media shared in chat. |
| System Logs | Server-Wide | System and application log files. |
| Backups | Server-Wide | System backup files. |
To free up disk space immediately, locate the category you want to clean and click the Clean button on the right side of that row. A confirmation dialog will appear — confirm to permanently delete all files in that category.
⚠ NOTE
Manual cleanup is permanent and cannot be undone. Call Recordings, Voicemails, and Chat files will be deleted immediately. Ensure you have exported or archived any files you need to retain before clicking Clean.
Click Configure in the yellow disk alerts banner (highlighted in Fig. 3) to open the Disk space alerts dialog. Enable the toggle, set the usage threshold percentage, and enter one or more recipient email addresses (comma-separated). Click Save.
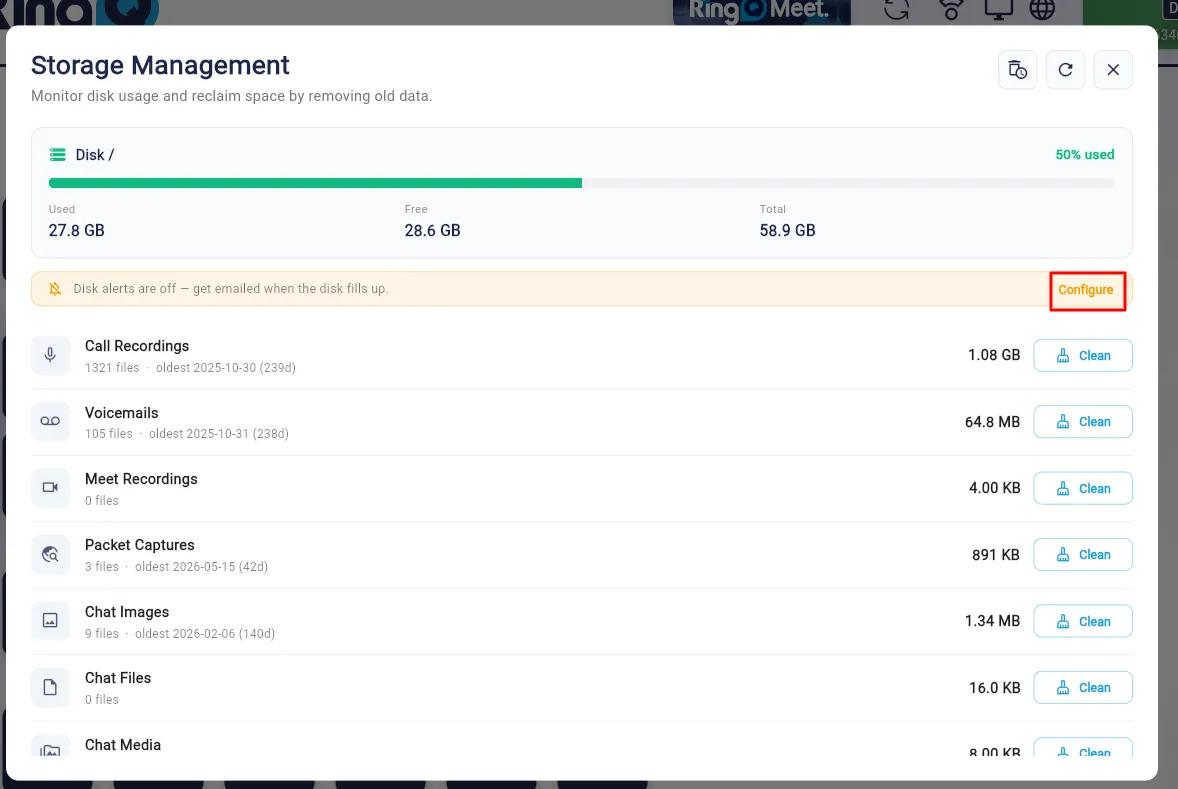
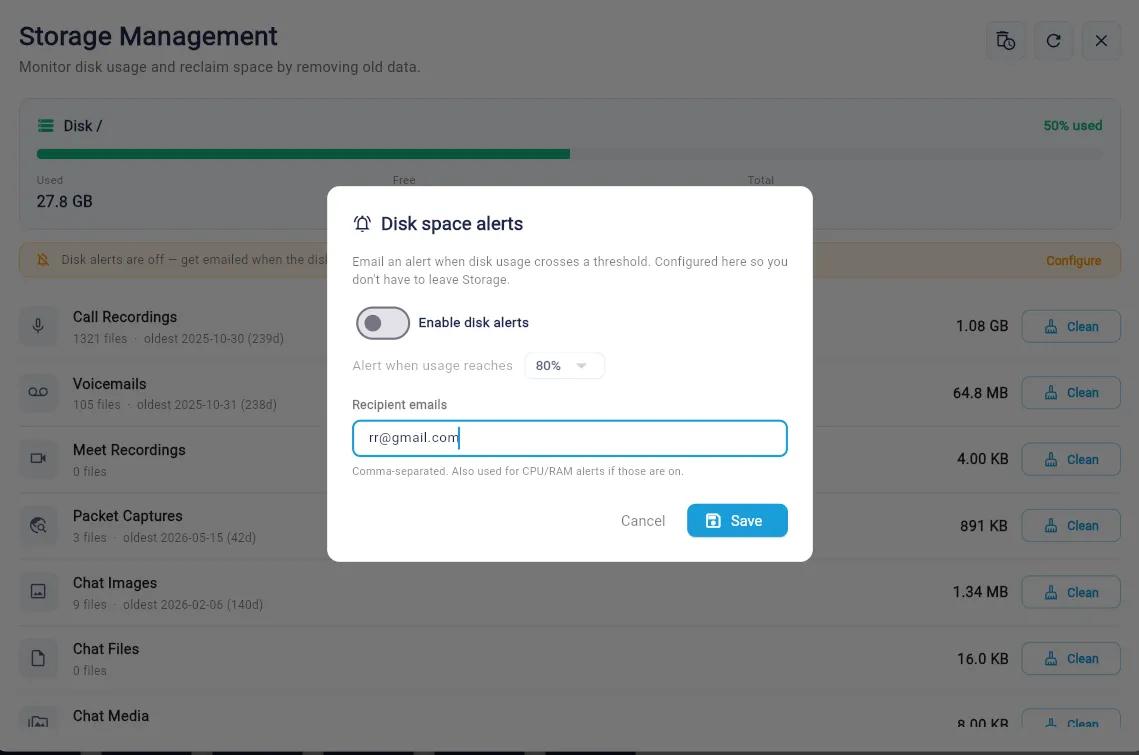
Fig. 4 — Disk space alerts dialog. Enable the toggle, set the alert threshold (e.g. 80%), and enter recipient email addresses.
⚠ NOTE
The recipient email addresses entered here are also used for CPU/RAM alerts if those are enabled. Multiple addresses can be entered separated by commas.
Click the Automatic Cleanup icon (highlighted in Fig. 5) in the top-right corner of the Storage Management panel to open the Automatic cleanup dialog.
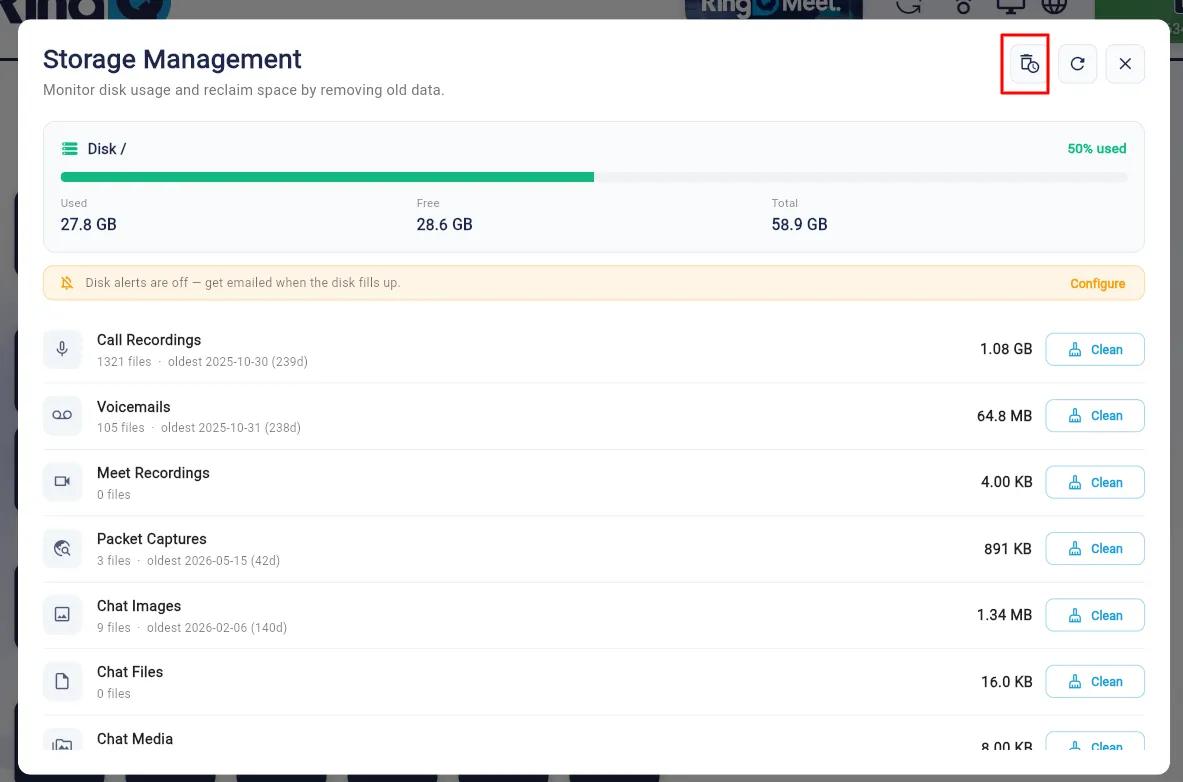
Fig. 5 — Storage Management panel with the Automatic Cleanup icon highlighted (red box).
In the Automatic cleanup dialog, enable the toggle for each category you want to auto-clean, and set the retention period using the day selector. Files older than the selected age will be deleted automatically each night. Click Save to apply.
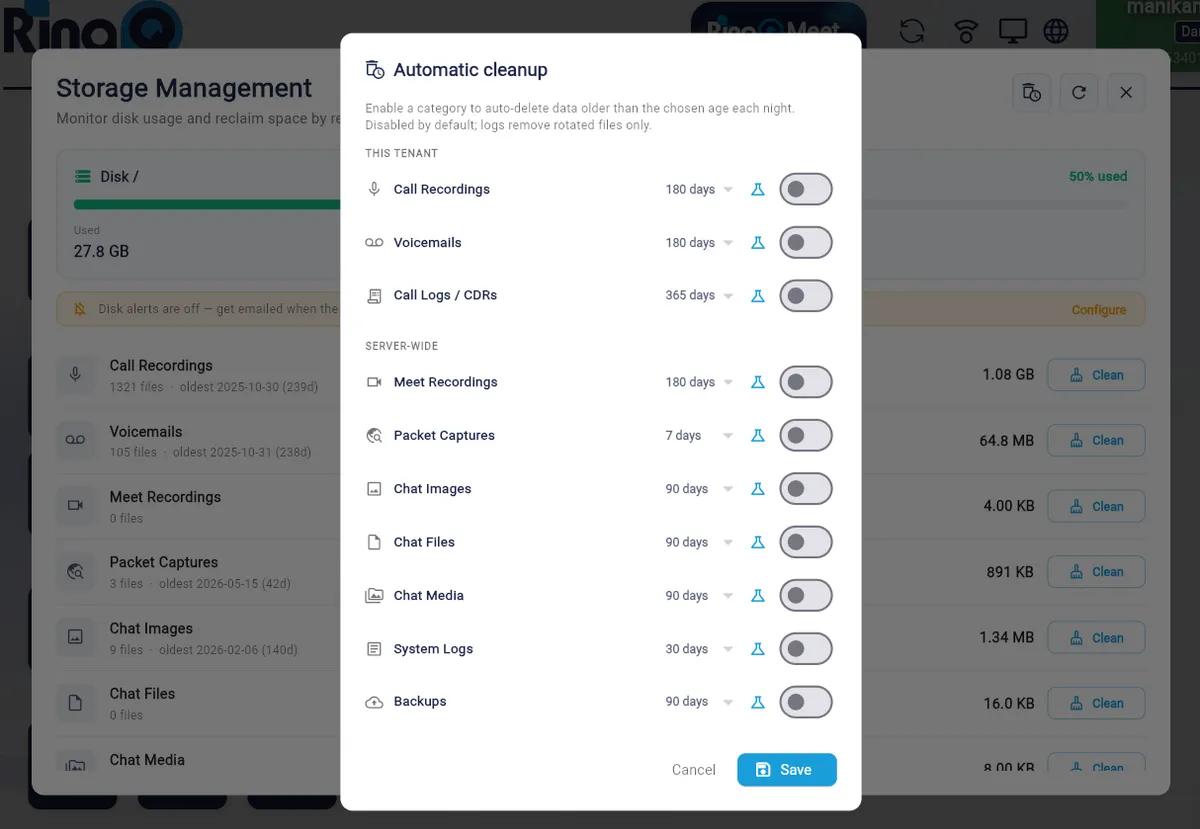
Fig. 6 — Automatic cleanup dialog showing per-category retention periods. Toggle each category on to enable nightly auto-deletion.
The default retention periods for each category are:
| Category | Scope | Default Retention |
|---|---|---|
| Call Recordings | This Tenant | 180 days |
| Voicemails | This Tenant | 180 days |
| Call Logs / CDRs | This Tenant | 365 days |
| Meet Recordings | Server-Wide | 180 days |
| Packet Captures | Server-Wide | 7 days |
| Chat Images | Server-Wide | 90 days |
| Chat Files | Server-Wide | 90 days |
| Chat Media | Server-Wide | 90 days |
| System Logs | Server-Wide | 30 days |
| Backups | Server-Wide | 90 days |
⚠ NOTE
Automatic cleanup runs nightly and deletes files older than the configured retention period. System Logs removes only rotated log files, not active logs. All categories are disabled by default — you must explicitly enable each one you want to auto-clean.
| # | Action | What Happens |
|---|---|---|
| 1 | Navigate to Storage | General Setting → Advanced section → click the Storage tile. |
| 2 | Review Disk Usage | Check the disk usage bar and data category list for used space and file counts. |
| 3 | Manual Clean | Click Clean on any category row to immediately delete all files in that category. |
| 4 | Configure Disk Alerts | Click Configure in the yellow banner → enable toggle → set threshold % → enter emails → Save. |
| 5 | Automatic Cleanup | Click the Automatic Cleanup icon → enable categories → set retention periods → Save. |
For support, contact support@ringq.com | ringq.com
