Admin
Users & Call Controls
- Creating Extensions for Users
- Editing and Managing Extensions
- Creating Teams & Assigning Extensions
- Configuring Agent Status & BLF
- Managing Extension Schedules
- Managing User Roles
- Managing Call Controls
- Setting up Shared Parking
- Voicemails
- The BLF Function
- Configuring the Speed Dial
- Configuring the Busy Lamp Field (BLF)
Deployment Methods & System Requirements
Installation Guides
Introduction to the RingQ Dialer
Introduction
The RingQ dialer is designed to simplify and enhance your calling experience with a range of powerful features. This guide will give you a complete overview of the dialer interface, walking you through each option—voicemail, call settings, contact tools, and more. Whether you’re managing daily calls or fine-tuning your settings, this guide will help you navigate the dialer confidently and make full use of its capabilities.
Getting Started
1. Log in to the RingQ App using your credentials.

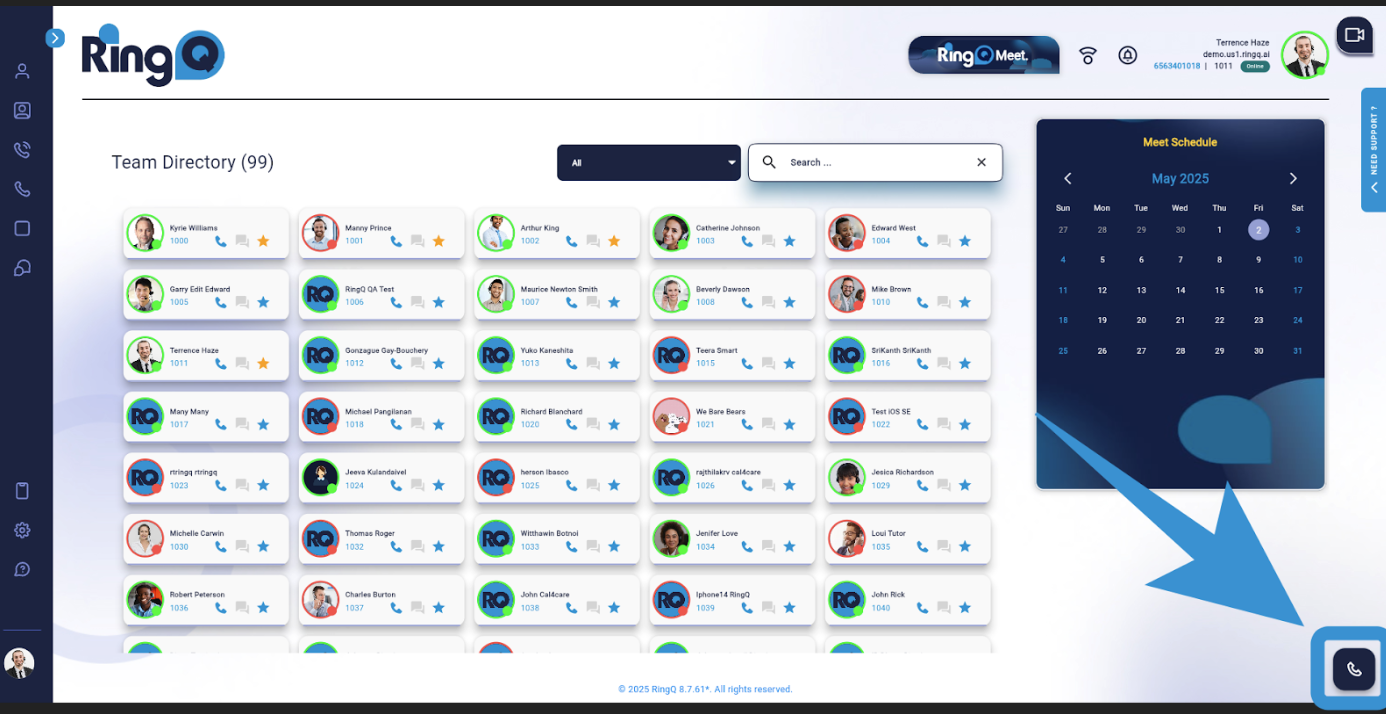
2. From the main dashboard, click “Dialer” located at the lower-right corner of the page.
Dialer Interface Overview
The Dialer interface is designed for fast, intuitive call handling with these key components:
- Dial Pad – Manually enter numbers or extensions.
- Avatars – Displays members and their real-time extension status.
- Favorites – Quick access to selected contacts from the Team Directory.
- Chats – (Coming soon)

- Call Parking – View available parking slots.
White light = available slot
Green light = call parked and available for pickup

- Wallboard – Displays queue data like Waiting Time, Active Calls, Abandoned Calls, and Total Calls.
- Call History – Shows recent missed, received, and placed calls.
- Voicemails – View voicemails received internally or externally.
- Contacts – Browse and call team members or clients.
- Settings – (Coming soon)
Call Controls and Features

Main In-Call Functions:
- Record – Start or stop call recordings for QA, compliance, or training.
- Hold – Pause the call temporarily and resume when needed.
- Survey – Launch post-call surveys automatically or manually.
- Transfer – Transfer calls using announced or blind transfer.
- DTMF – Send DTMF tones during a call using the dial pad.
- Conference – Add multiple participants to a live call.
- Speaker – Switch between speaker and headset/handset audio.
- Video – Start or stop video during a call.
- Mute/Unmute – Disable or re-enable your microphone.
- End Call – Ends the current call session.
Making a Call
Manual Dialing:
1. Click the Dial Pad icon.
2. Enter the number or extension.
3. Press the Call button.
Calling from Contacts:
1. Open the Contacts tab.
2. Click the contact, then tap the Call icon.
Calling from Call History:
1. Go to the Call History tab.
2. Click the contact or number.
3. Tap the Call icon.
Calling from Favorites:
1. Open the Favorites tab.
2. Click an extension to start the call instantly.
Receiving and Answering Calls
- Incoming Call – A pop-up will appear for all incoming calls.
- Answer – Click the answer button.
- Reject – Click the reject button.
- Once connected, the call timer will start.
Advanced Features
Voicemail:

1. Go to the Voicemail tab.
2. Select a message to listen to.
3. Delete or save as needed.
Call Recording:
1. During a call, click Record to begin recording.
2. Click again to stop.
To access recordings: Go to Settings > Global > System Recording
Call Monitoring (Supervisors and Managers):

Supervisors and managers can monitor agent performance and provide real-time assistance.
- Observe – Listen to ongoing calls.
- Coaching Mode – Speak only to the agent.
- Takeover – Join the call when necessary.
- Rate – Provide a performance score after the call.
Post-Call Survey via IVR:
- Rating – Caller rates the service from 1 (best) to 5 (poor).
- Confirmation – IVR confirms the rating.
Conference Calling
 Setting Up a Conference:
1. Dial the first participant.
2. Click the Conference button to add more participants.
Managing Participants:
- View all participants in the call.
- Add or remove members as needed.
- See who is speaking or muted.
Customizing the Dialer
Customize the dialer through the Chameleon feature available in the Web App. Refer to the Chameleon User Guide for more details.


 Setting Up a Conference: