Introduction
This document describes the configuration of pfSense for use with RingQ. This guide is written for PBX administrators on networks with a single WAN IP, or who are using their primary WAN IP for RingQ.
Configure Port Forwarding (NAT)
1. Login to the pfSense web management console and navigate to “Firewall” > “NAT”.
2. Use the “Add” button on the right to add a new rule.
3. Create NAT rules for all required ports that need to be forwarded, based on this list.
- “Protocol”: Set the protocol type depending on the port(s) you are forwarding.
- “Destination port range”: Select the port / port range for the NAT entry. If the port is not predefined as shown for SIP, enter the custom port number(s).
- “Redirect target IP”: Enter the internal IP address of the RingQ Phone System.
- “Redirect target port”: Enter the internal port, commonly the same as the external port.
- “Description”: Label the rule for easier identification.
- “NAT reflection”: Use system default.
- “Filter rule association”: Add associated filter rule.
4. Click on “Save” and then “Apply” to activate the configuration and repeat these steps for each required NAT entry.
5. Repeat step #3 for every forwarded port.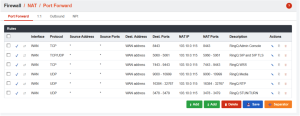
Port Preservation (Full Cone NAT)
1. Navigate to “Firewall” > “NAT” > “Outbound”.
2. Set the type from automatic to “Hybrid” and press “Save”.
3. Now create a new “Mapping Rule” as in the example above to set:
4. “Source” for the RingQ host LAN IP, e.g. 192.x.x.x.
5. “Port or Range” – enable “Static Port”.
6. Move the rule to the first position in your “Mappings NAT table” to ensure operation, as shown in the first screenshot in this section.
7. Make sure you have now applied settings on both the “Port Forward” and “Outbound” pages.
FQDN Management
In the next step of this guide, you will need to decide how you want to manage the RingQ FQDN within your network. There are two available options: Split Brain DNS and Hairpin NAT. Split Brain DNS keeps RingQ network traffic within the internal network instead of sending it through the WAN interface, which helps optimize traffic flow. However, it requires a more complex configuration. On the other hand, Hairpin NAT is simpler to set up but consumes more WAN bandwidth and may lead to reduced call quality in certain scenarios. For best performance and efficiency, we recommend using Split Brain DNS whenever possible.
OPTION 1: Configuring Split Brain DNS
1. Navigate to “Services” > “DNS Resolver”.
2. Under General Settings tab, ensure that DNS Resolver is enabled
3. Ensure that “All” is selected under “Network Interfaces” (or any specific interfaces you want DNS Resolver to listen on – Typically LAN)
4. Ensure DNS Query Forwarding is enabled
5. At the bottom of the page, under the Host Overrides section, click “Add”
6. Add the host, domain, IP address as required, then click “Save”. The host will be the first part of your RingQ FQDN and the domain will be the last part of your RingQ FQDN. The IP Address will be the internal IP address of the RingQ Phone System. [e.g., Host: Service, Domain: ringq.com, IP: 103.x.x.x]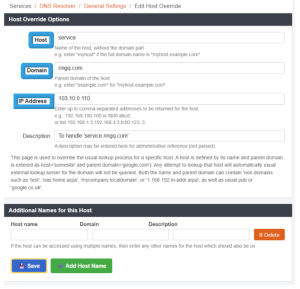
7. Ensure your devices are using pfSense for DNS resolution (or using a device that does forwarding to pfSense for unknown queries). This configuration is usually handled by your DHCP server and the DNS servers it hands out.
OPTION 2: Configuring Hairpin NAT
1. Navigate to “System” > “Advanced”.
2. Change “NAT Reflection mode for port forwards” to “Pure NAT”, activate the
3. “Enable NAT Reflection for 1:1 NAT” checkbox and activate the “Enable automatic outbound NAT for Reflection” checkbox.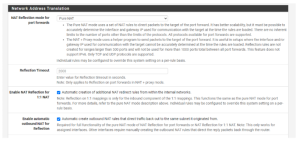
Validating Your Setup
To validate your NAT and Port Forwarding configuration, go to “Dashboard” > “Firewall” in the RingQ Management Console and run the RingQ Firewall Checker.
This tool will verify whether your firewall is correctly configured for use with RingQ. To validate your Split-Brain DNS configuration, you can use the nslookup tool from within your network (behind your pfSense firewall) to check how DNS is being resolved.
Simply enter the command nslookup , where refers to your RingQ FQDN and is the IP address of the DNS server you want to query. When querying an external DNS server, the result should return your WAN IP address, while querying your internal pfSense DNS Resolver should return the internal IP address of the RingQ Phone System.
The below example shows checking the external IP resolution of FQDN “service.ringq.com” against Google’s public DNS servers (8.8.8.8)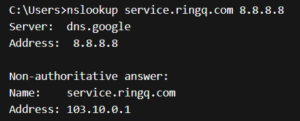
The below example shows checking the internal IP resolution of FQDN “service.ringq.com” against your internal pfSense Resolver (103.10.0.1):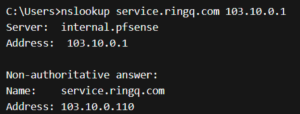
1. To validate your Hairpin NAT setup, try accessing your RingQ FQDN from a computer inside the network by FQDN. If you are able to load the webclient, NAT Hairpinning should be working.
2. In some cases, you might have to reboot the firewall for the changes to take effect.
3. If your remote phones or VoIP provider mostly work but randomly disconnect, then consider changing this option.
1. Go to “System” > “Advanced”.
2. Set “Firewall Optimization Options” to “Conservative”.
3. Click on “Save”.