Introduction
This document describes the configuration of a Cisco router for use with RingQ. Cisco routers support both NAT and firewall access control lists (ACLs). If the firewall is enabled, both NAT and firewall access rules must be configured to allow NAT to function properly.
Note: If the firewall is not enabled, follow Step 1 in the procedure below. To configure both NAT and firewall settings, follow Steps 1 and 2 in the procedure below.
Configure Port Forwarding (NAT)
1. Login to the SDM (Web interface) of the Cisco router. E.g. if the router IP is 192.168.1.1, using a web browser open the URL: http://192.168.1.14 (use HTTPS if Cisco Web Interface is running on a secure port).
2. Click on the “Configure” button to start configuring the router.
3. Click on the “NAT” button on the left side menu then and on the “Edit NAT Configuration” tab to start publishing ports on the router for the RingQ Phone System.
4. Add the following NAT entries to a new or already existing NAT table. For an always up to date list of the ports that need to be open check here, as the ports may depend on the version you are using:
- Inbound TCP port 5060 mapped to the PBX internal IP.
- Inbound TCP port 5061 mapped to the PBX internal IP.
- Inbound UDP port 5060 mapped to the PBX internal IP.
- Inbound UDP port 5061 mapped to the PBX internal IP.
- Inbound UDP ports 9000 to 10999 mapped to the PBX internal IP
- Inbound UDP port 3478 mapped to the PBX internal IP.
- Inbound UDP port 3479 mapped to the PBX internal IP.
5. Click on “Add” to add a new NAT rule.

6. To map ports follow the steps below:
1. Select “Static”.
2. Set “Direction” to “From Inside to Outside”.
3. Set “IP address of Translate from interface” to the RingQ Phone System’s internal IP.
4. Set the “Network Mask” to the RingQ Phone System subnet mask.
5. Set “Translate to interface Type” to IP address or interface
Note: If you have more than 1 IP bound to the same interface, and want RingQ to listen on a particular IP, choose “IP address”.
If in step 5 you chose:
- “IP address”: specify the external IP you want the RingQ Phone System to listen on.
- “Interface”: from the interface drop down menu choose the interface where RingQ should be published.
6. Check “Redirect Port”.
7. Check if it is “TCP” or “UDP” depending on the Port being configured.
8. Specify the original port and translated port (these should be the same port number).
7. Click on “OK” to apply the NAT entry.
Repeat Step 5 to map every port required by RingQ.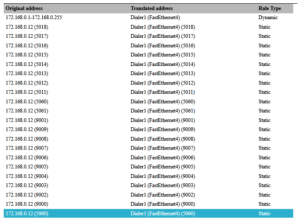
When all default ports are configured, the final NAT table should look like the one shown above.
Configuring Firewall and ACLs
For an up to date list of the ports that need to be opened check this guide.
1. Add the following ACLs to the existing or new ACL (if firewall is enabled):
- Inbound TCP port 5060 mapped to the PBX internal IP.
- Inbound TCP port 5061 mapped to the PBX internal IP.
- Inbound UDP port 5060 mapped to the PBX internal IP
- Inbound UDP port 5061 mapped to the PBX internal IP.
- Inbound UDP ports 9000 to 10999 mapped to the PBX internal IP.
- Inbound UDP port 3478 mapped to the PBX internal IP.
- Inbound UDP port 3479 mapped to the PBX internal IP.
2. To add rules to the Firewall, click on the Firewall and ACL button on the left side menu.
3. Click on the “Edit Firewall Policy / ACL” tab.
4. Check “Originating traffic” and from the “Access Rule Window” click on “Add” to add a new rule.
1. Set “Select Action” to Permit.
2. Description is not mandatory.
3. Set “Source Host/Network Type” to Any IP Address.
4. Set “Destination Host/Network Type” to A Host Name or IP Address.
5. Configure the internal IP of the RingQ Phone System in “Set Host Name/IP”.
6. Check UDP or TCP (depending on which port is being configured) from Protocol and Services.
7. Set “Source Port” to “Any”.
8. Set “Destination Port” to the port number the rule is being applied for.
9. Click on “OK”.
5. Repeat Steps 3 and 4 to allow access to every port required by RingQ.
6. When all default ports are configured, the final firewall table should look similar to the above screenshot.
7. When ready, click on “File” menu and select “Write to Startup Config” so that this configuration is used the next time the Cisco device is rebooted.
8. Exit the configuration.