Introduction
This document outlines the configuration of a DrayTek for use with the RingQ. It covers the NAT settings required for RingQ as well as the QoS configuration to prioritize SIP and RTP traffic. The router’s Web Interface default IP address is 192.168.1.1. You may also check the updated port list here.
Disable SIP ALG
You first need to disable SIP ALG on your Draytek Router by following the steps outlined below: 1. Open a Command Prompt and telnet to the Draytek router by typing the following command: telnet IP-Vigor_Router 2. Enter the following two commands to disable the SIP ALG Handler on the device:
- sys sip_alg 0
- sys commit
- kmodule_ctl nf_nat_sip disable
- kmodule_ctl nf_conntrack_sip disable
Configure Port Forwarding (NAT)
1. Browse to the Router’s Web Interface. 2. Go to the “NAT” > “Open Ports” menu item.\
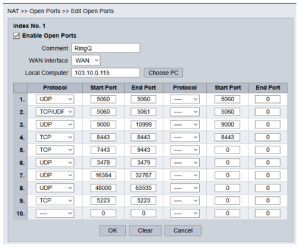 3. Go to the first free position in the “Open Port” menu, and configure as follows:
1. Ensure the “Enable Open Ports” checkbox is enabled
2. Set the “Comment” field value to “RingQ”
3. Set the “WAN Interface” field to “WAN1”
4. Set the “Local Computer” field to the assigned IP address of the RingQ.
5. Each line is used to open a single port or port range and set the protocol.
6.Open all ports required by RingQ. For an up-to-date list of the ports required to be open check here.
7. Click on the “OK” button at the bottom of the page. This will send you back to the “Open Ports” summary page.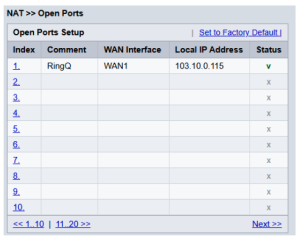
QOS Configuration – Bandwidth Management
1. Browse to the Router’s Web Interface. Then, go to the “Bandwidth Management” > “Quality of Service” menu item. 2. Click the “Edit” link in the “Service Type” column. 3. For each port and port range your RingQ installation uses, fill in the following fields. Add:
- “Service Name”: use a suitable name to denote what this port is used for.
- “Service Type”: TCP and/or UDP depending on the port you are opening.
- “Type”: Single or Range
- “Port Number”: the service port number or range to add
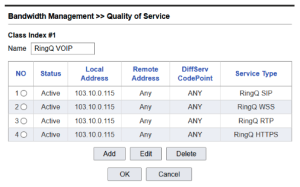
Creating a Class Rule
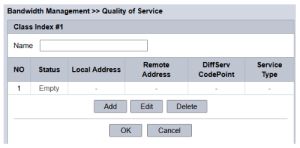 1. Click on the “Edit” link in the “Class 1” row in the “Rule” column
2. Set the “Name” field to “RingQ VoIP”. Click on the “Add” button
3. Set the:
1. Click on the “Edit” link in the “Class 1” row in the “Rule” column
2. Set the “Name” field to “RingQ VoIP”. Click on the “Add” button
3. Set the:
- “ACT” field to enabled
- “Local Address” field to the IP address of the PBX machine (in this
- example 192.168.1.200)
- Ensure the “Remote Address” field is set to “Any”
- Ensure the “DiffServ CodePoint” field is set to “Any”
- In “Service Type” add one of the service types you created in Step 2.
Assign a Priority Level
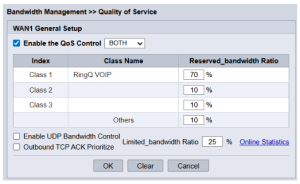
Instruct the router to assign a priority level to traffic of class “RingQ VOIP”. 1. In “Bandwidth Management” > “Quality of Service” click on the “Setup” link on the “WAN1” row.
 2. Check the “Enable the QoS Control” checkbox, and set the traffic direction to “BOTH”.
3. Set the “Reserved_bandwidth Ratio” field for traffic of class “RingQ VOIP” to 70%.
4. Set the “Reserved_bandwidth Ratio” field for traffic of Class 2 and Class 3 to 10%.
5. Click on the “OK” button to complete the configuration.
2. Check the “Enable the QoS Control” checkbox, and set the traffic direction to “BOTH”.
3. Set the “Reserved_bandwidth Ratio” field for traffic of class “RingQ VOIP” to 70%.
4. Set the “Reserved_bandwidth Ratio” field for traffic of Class 2 and Class 3 to 10%.
5. Click on the “OK” button to complete the configuration.
Users of Draytek VoIP Models
If you have a Draytek VoIP model you also need to perform the following steps in addition to the steps described above to enable it to work with RingQ. 1. Log in to your Draytek Router’s Web Interface 2. Select “VoIP” and then click on “SIP Accounts” in the Draytek Management Console 3. Select “Change the SIP port in VoIP” to something else other than “5060”. Note: All SIP account ports should be changed. 4. Press “OK” to save your changes. 5. When you finish modifying all your accounts, restart your Draytek Router.