Introduction
This guide provides step-by-step instructions on how to access your Grandstream IP Phone, obtain its MAC address, and complete the auto provisioning process in RingQ. By following this guide, your device will be properly registered and ready for use.
Access the IP Phone Web Interface
1. Connect your Grandstream IP Phone to the same network as your computer.
2. On your browser, type the IP address of the Grandstream IP Phone (e.g.,192.168.100.xxx) in the address bar.
3. Enter the Username and Password to log in to the web interface.
Obtain the Phone’s MAC Address
1. Connect your Grandstream IP Phone to the same network as your computer.
2. On your browser, type the IP address of the Grandstream IP Phone (e.g.,192.168.100.xxx) in the address bar and log into the web interface.
3. Once logged in, locate and copy the MAC Address of your IP Phone. You can also find the MAC Address on the back label of the phone device.
Register the Device on RingQ Auto Provision
1. Log in to your RingQ Web Portal.
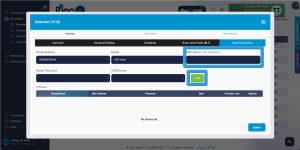
2. Select an Extension and Navigate to Auto Provisioning.
3. Select IP Phone Brand and Model.
4. Input the MAC Address of your IP Phone into the designated field.
5. Click the Add button to register the device.
6. Select your timezone and STUN server and click on “Update”.
7. Click the Copy button under the provisioning Link section to copy the provisioning URL.
Auto Provisioning the IP Phone
1. Return to the Grandstream web Interface.
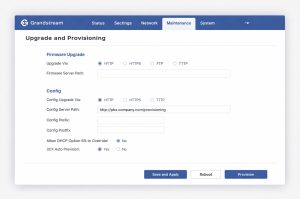
2. Go to Maintenance> Upgrade & Provisioning
3. Select HTTPS.
4. Paste the auto-provisioning link into the Config Server Path, then click Save and
5. Apply, and proceed to Provision.
Verify the Provisioning Status
1. Go to the Line Status page on the IP Phone interface.
2. Confirm that the Auto Provision process was successful. The phone should now display the registered RingQ account and be ready for use.